(2020-Jan-28) This blog post is a followup to my previous post about DevOps (CI/CD) for Azure Data Factory - Continuous integration and delivery (CI/CD) in Azure Data Factory using DevOps and GitHub - Part 1 where I described a method to design a Data Factory code release & deployment to other environments.

Part 1:

Simple approach for Azure Data Factory code deployment by connecting code git repository to Azure DevOps Release pipelines to promote code to other environments.
Part 2: This time I would like to shed more light on how to utilize both Build and Release pipelines in Azure DevOps for Data Factory code deployment along with other supplementary artifacts. Other code artifacts could be PowerShell scripts, Database projects, Databricks notebooks, Logic Apps, etc.

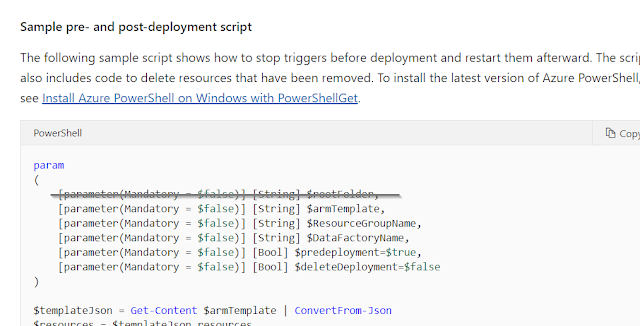
To illustrate the 2nd approach using both Build and Release Azure DevOps pipelines I will be using PowerShell script from the official Microsoft documentation resource for Data Factory CI/CD - https://docs.microsoft.com/en-us/azure/data-factory/continuous-integration-deployment#sample-pre--and-post-deployment-script
In this script, I will make only one single code change by removing the first parameter because it's not used there.
Step 1: Creating a Build pipeline (Azure DevOps)
1.a Add PowerShell script to your source control: In my case, I had to add the complete PowerShell script pre- and post-deployment Data Factory steps to my existing GitHub repository, that already contained initial code and deployment ARM templates of my Data Factory. And I named this script file as "adf_triggers_environment_cleanup.ps1".

1.b Access to DevOps: If you don't have a DevOps account, you can start for free - https://azure.microsoft.com/en-ca/services/devops/ or ask your DevOps team to provide you with access to your organization build/release environment.
1.c Create new DevOps project: by clicking [+ Create project] button you start creating your build/release solution.
1.d Create a new Build pipeline:
Select [Pipelines] > [Build] and then click the [New pipeline] button in order to create a new build pipeline for your ADF solution. Then I choose "Use the classic editor" option at the bottom of my window.

1.e Select a source:
In my case, the PowerShell script code is stored in my personal GitHub repository. So I need to set the corresponding name of this repository and default code branch (your selection may vary depending on how your name and structure code in your source control). And then I click the [Continue] button.
1.f Add build steps:
a) Click [Empty Job] button, then Add a new [Copy Files] task and set the following parameters:
- "Source Folder", set it to the path where you PowerShell script code resides (scripts):

- "Contents" is set to "**"
- "Target Folder", it's your choice, but we can use Predefined variables with the additional file structure. In my case, the value for the target folder would be: $(build.artifactstagingdirectory)\scripts
b) Add new [Publish build artifacts] task with no changes to the default parameters and settings.
c) Enable trigger for Continuous Integration.
d) Give a meaningful name for your new build pipeline and click [Save] to preserve your changes. You've just created a build pipeline for your PowerShell script.
Then I need to create another build pipeline for my Azure Data Factory code:
1.d Create a new Build pipeline: I repeat the same step as it has been previously described in my first build pipeline.
1.e Select a source:
- "Repository" is the same as it has been chosen in my first build pipeline
- "Default branch" is set to adf_publish, since that's where Azure Data Factory maintains its ARM deployment templates.
1.f Add build steps:
a) Click [Empty Job] button, then Add a new [Copy FIies] task and set the following parameters:
- "Source Folder", set it to the path where your Data Factory code resides:

- "Contents" is set to "*.json"
- "Target Folder", it's your choice, but we can use Predefined variables with the additional file structure. In my case, the value for the target folder would be $(build.artifactstagingdirectory)\adf
b) Add new [Publish build artifacts] task with no changes to the default parameters and settings.
c) Enable trigger for Continuous Integration.
d) Give a meaningful name for your new build pipeline and click [Save] to preserve your changes. You've just created a build pipeline for your Data Factory deployment ARM templates.
As a result, I have two build pipelines in my Azure DevOps workspace for my PowerShell script and Azure Data Factory deployment ARM templates.

Step 2: Creating a Release pipeline (Azure DevOps)
The process of creating new Release pipelines was described in my initial Continuous integration and delivery (CI/CD) in Azure Data Factory using DevOps and GitHub - Part 1 blog post.
Or I can change my existing Release pipeline and transfer artifact sourcing from direct git repository to my new build pipelines.
Changes are:
2.e (Part 1) Add a new Build artifact to your release pipeline - for PowerShell script
- Source Type - Build
- Project - name of your existing Azure DevOps project with build pipelines
- Source - name of your build pipeline with the PowerShell script code
- Default version - Latest
- Enable deployment triggers with branch filters to Include master branch

2.e (Part 1) Add a new Build artifact to your release pipeline - for Azure Data Factory ARM templates
- Source Type - Build
- Project - name of your existing Azure DevOps project with build pipelines
- Source - name of your build pipeline with the Azure Data Factory code
- Default version - Latest
- Enable deployment triggers with branch filters to Include adf_publish branch
2.f (Part 1) Add new Stage to your Release pipeline
For the (Azure Resource Group Deployment) task, I change the following attributes:
- Template: in my case the linked ART template file location is
$(System.DefaultWorkingDirectory)/_ADF PASS CICD - CI - ARM/drop/adf/ARMTemplateForFactory.json
- Template parameters: in my case the linked ARM template parameters file location is
$(System.DefaultWorkingDirectory)/_ADF PASS CICD - CI - ARM/drop/adf/ARMTemplateParametersForFactory.json
Also, I added two new Azure PowerShell scripts: (1) pre-deployment step to disable triggers and (2) post-deployment step to remove deleted ADF objects during my incremental deployment and enable active triggers.
(1) Azure PowerShell script: ADF Disable Trigger
- Script File Path: $(System.DefaultWorkingDirectory)/_ADF PASS CICD - CI - Code/drop/scripts/adf_triggers_environment_cleanup.ps1
- Scripts Arguments:
-armTemplate "$(System.DefaultWorkingDirectory)/_ADF PASS CICD - CI - ARM/drop/adf/ARMTemplateForFactory.json"
-ResourceGroupName azu-caes-$(Environment)-rg
-DataFactoryName $(factoryName)
-predeployment $true
(2) Azure PowerShell script: ADF Enable Trigger
- Script File Path: $(System.DefaultWorkingDirectory)/_ADF PASS CICD - CI - Code/drop/scripts/adf_triggers_environment_cleanup.ps1
- Scripts Arguments:
-armTemplate "$(System.DefaultWorkingDirectory)/_ADF PASS CICD - CI - ARM/drop/adf/ARMTemplateForFactory.json"
-ResourceGroupName azu-caes-$(Environment)-rg
-DataFactoryName $(factoryName)
-predeployment $false
Here is the final order of my Release pipeline deployment steps:

Note about $deleteDeployment parameter for my PowerShell script task:
If you look closer to the original code from the Microsoft site, then you will notice that it's sampled to remove the latest deployment from the Resource Group. However in most cases, you'd like to keep the history of your deployment in Azure as well, therefore I kept the original value for this $deleteDeployment parameter to $false.
But there is a limit to hold 800 deployments in the deployment history for a resource group in Azure - Azure subscription and service limits, quotas, and constraints. So, in this case, I would suggest adjusting this portion of the PowerShell code to, let's say, remove deployments that are 3 months old and then you can set the $deleteDeployment parameter according to your needs.
Step 3: Test CI/CD process for my Azure Data Factory
Now it's time to test a complete cycle of committing new data factory code changes and deploying them both to Testing and Production environments using both Build and Release pipelines.
1) ADF code changes:
- I make additional code changes to Azure Data Factory,
- Then I commit those code changes to my master git repository branch
- And publish those changes from the master branches to live Data Factory, this also creates ARM deployment templates for further deployment
2) Build pipeline:
My "ADF PASS CICD - CI - ARM" build pipeline is automatically triggered

3) Release pipeline
When my Build pipeline is finished, then Release pipeline is automatically started and Data Factory code is deployed both to Testing and Production environments, PowerShell scripts are executed as well.

Summary:
1) Both Build and Release Azure DevOps pipelines can be successfully used for Data Factory code deployment.
2) ADF triggers' code deployment is properly managed with the help of the PowerShell script.
Link to my GitHub repository with the ADF solution from this blog post can be found here: https://github.com/NrgFly/ADF-CICD
Happy data adventure!
Part 1:
Simple approach for Azure Data Factory code deployment by connecting code git repository to Azure DevOps Release pipelines to promote code to other environments.
Part 2: This time I would like to shed more light on how to utilize both Build and Release pipelines in Azure DevOps for Data Factory code deployment along with other supplementary artifacts. Other code artifacts could be PowerShell scripts, Database projects, Databricks notebooks, Logic Apps, etc.
To illustrate the 2nd approach using both Build and Release Azure DevOps pipelines I will be using PowerShell script from the official Microsoft documentation resource for Data Factory CI/CD - https://docs.microsoft.com/en-us/azure/data-factory/continuous-integration-deployment#sample-pre--and-post-deployment-script
In this script, I will make only one single code change by removing the first parameter because it's not used there.

Step 1: Creating a Build pipeline (Azure DevOps)
1.a Add PowerShell script to your source control: In my case, I had to add the complete PowerShell script pre- and post-deployment Data Factory steps to my existing GitHub repository, that already contained initial code and deployment ARM templates of my Data Factory. And I named this script file as "adf_triggers_environment_cleanup.ps1".
1.b Access to DevOps: If you don't have a DevOps account, you can start for free - https://azure.microsoft.com/en-ca/services/devops/ or ask your DevOps team to provide you with access to your organization build/release environment.
1.c Create new DevOps project: by clicking [+ Create project] button you start creating your build/release solution.
1.d Create a new Build pipeline:
Select [Pipelines] > [Build] and then click the [New pipeline] button in order to create a new build pipeline for your ADF solution. Then I choose "Use the classic editor" option at the bottom of my window.

1.e Select a source:
In my case, the PowerShell script code is stored in my personal GitHub repository. So I need to set the corresponding name of this repository and default code branch (your selection may vary depending on how your name and structure code in your source control). And then I click the [Continue] button.
1.f Add build steps:
a) Click [Empty Job] button, then Add a new [Copy Files] task and set the following parameters:
- "Source Folder", set it to the path where you PowerShell script code resides (scripts):
- "Contents" is set to "**"
- "Target Folder", it's your choice, but we can use Predefined variables with the additional file structure. In my case, the value for the target folder would be: $(build.artifactstagingdirectory)\scripts
b) Add new [Publish build artifacts] task with no changes to the default parameters and settings.
c) Enable trigger for Continuous Integration.
d) Give a meaningful name for your new build pipeline and click [Save] to preserve your changes. You've just created a build pipeline for your PowerShell script.
Then I need to create another build pipeline for my Azure Data Factory code:
1.d Create a new Build pipeline: I repeat the same step as it has been previously described in my first build pipeline.
1.e Select a source:
- "Repository" is the same as it has been chosen in my first build pipeline
- "Default branch" is set to adf_publish, since that's where Azure Data Factory maintains its ARM deployment templates.
1.f Add build steps:
a) Click [Empty Job] button, then Add a new [Copy FIies] task and set the following parameters:
- "Source Folder", set it to the path where your Data Factory code resides:
- "Contents" is set to "*.json"
- "Target Folder", it's your choice, but we can use Predefined variables with the additional file structure. In my case, the value for the target folder would be $(build.artifactstagingdirectory)\adf
b) Add new [Publish build artifacts] task with no changes to the default parameters and settings.
c) Enable trigger for Continuous Integration.
d) Give a meaningful name for your new build pipeline and click [Save] to preserve your changes. You've just created a build pipeline for your Data Factory deployment ARM templates.
As a result, I have two build pipelines in my Azure DevOps workspace for my PowerShell script and Azure Data Factory deployment ARM templates.
Step 2: Creating a Release pipeline (Azure DevOps)
The process of creating new Release pipelines was described in my initial Continuous integration and delivery (CI/CD) in Azure Data Factory using DevOps and GitHub - Part 1 blog post.
Or I can change my existing Release pipeline and transfer artifact sourcing from direct git repository to my new build pipelines.
Changes are:
2.e (Part 1) Add a new Build artifact to your release pipeline - for PowerShell script
- Source Type - Build
- Project - name of your existing Azure DevOps project with build pipelines
- Source - name of your build pipeline with the PowerShell script code
- Default version - Latest
- Enable deployment triggers with branch filters to Include master branch
2.e (Part 1) Add a new Build artifact to your release pipeline - for Azure Data Factory ARM templates
- Source Type - Build
- Project - name of your existing Azure DevOps project with build pipelines
- Source - name of your build pipeline with the Azure Data Factory code
- Default version - Latest
- Enable deployment triggers with branch filters to Include adf_publish branch
2.f (Part 1) Add new Stage to your Release pipeline
For the (Azure Resource Group Deployment) task, I change the following attributes:
- Template: in my case the linked ART template file location is
$(System.DefaultWorkingDirectory)/_ADF PASS CICD - CI - ARM/drop/adf/ARMTemplateForFactory.json
- Template parameters: in my case the linked ARM template parameters file location is
$(System.DefaultWorkingDirectory)/_ADF PASS CICD - CI - ARM/drop/adf/ARMTemplateParametersForFactory.json
Also, I added two new Azure PowerShell scripts: (1) pre-deployment step to disable triggers and (2) post-deployment step to remove deleted ADF objects during my incremental deployment and enable active triggers.
(1) Azure PowerShell script: ADF Disable Trigger
- Script File Path: $(System.DefaultWorkingDirectory)/_ADF PASS CICD - CI - Code/drop/scripts/adf_triggers_environment_cleanup.ps1
- Scripts Arguments:
-armTemplate "$(System.DefaultWorkingDirectory)/_ADF PASS CICD - CI - ARM/drop/adf/ARMTemplateForFactory.json"
-ResourceGroupName azu-caes-$(Environment)-rg
-DataFactoryName $(factoryName)
-predeployment $true
(2) Azure PowerShell script: ADF Enable Trigger
- Script File Path: $(System.DefaultWorkingDirectory)/_ADF PASS CICD - CI - Code/drop/scripts/adf_triggers_environment_cleanup.ps1
- Scripts Arguments:
-armTemplate "$(System.DefaultWorkingDirectory)/_ADF PASS CICD - CI - ARM/drop/adf/ARMTemplateForFactory.json"
-ResourceGroupName azu-caes-$(Environment)-rg
-DataFactoryName $(factoryName)
-predeployment $false
Here is the final order of my Release pipeline deployment steps:
Note about $deleteDeployment parameter for my PowerShell script task:
If you look closer to the original code from the Microsoft site, then you will notice that it's sampled to remove the latest deployment from the Resource Group. However in most cases, you'd like to keep the history of your deployment in Azure as well, therefore I kept the original value for this $deleteDeployment parameter to $false.
if ($deleteDeployment -eq $true) {
        Write-Host "Deleting ARM deployment ... under resource group: " $ResourceGroupName
        $deployments = Get-AzResourceGroupDeployment -ResourceGroupName $ResourceGroupName
        $deploymentsToConsider = $deployments | Where { $_.DeploymentName -like "ArmTemplate_master*" -or $_.DeploymentName -like "ArmTemplateForFactory*" } | Sort-Object -Property Timestamp -Descending
        $deploymentName = $deploymentsToConsider[0].DeploymentName

       Write-Host "Deployment to be deleted: " $deploymentName
        $deploymentOperations = Get-AzResourceGroupDeploymentOperation -DeploymentName $deploymentName -ResourceGroupName $ResourceGroupName
        $deploymentsToDelete = $deploymentOperations | Where { $_.properties.targetResource.id -like "*Microsoft.Resources/deployments*" }

        $deploymentsToDelete | ForEach-Object {
            Write-host "Deleting inner deployment: " $_.properties.targetResource.id
            Remove-AzResourceGroupDeployment -Id $_.properties.targetResource.id
        }
        Write-Host "Deleting deployment: " $deploymentName
        Remove-AzResourceGroupDeployment -ResourceGroupName $ResourceGroupName -Name $deploymentName
    }
But there is a limit to hold 800 deployments in the deployment history for a resource group in Azure - Azure subscription and service limits, quotas, and constraints. So, in this case, I would suggest adjusting this portion of the PowerShell code to, let's say, remove deployments that are 3 months old and then you can set the $deleteDeployment parameter according to your needs.
Step 3: Test CI/CD process for my Azure Data Factory
Now it's time to test a complete cycle of committing new data factory code changes and deploying them both to Testing and Production environments using both Build and Release pipelines.
1) ADF code changes:
- I make additional code changes to Azure Data Factory,
- Then I commit those code changes to my master git repository branch
- And publish those changes from the master branches to live Data Factory, this also creates ARM deployment templates for further deployment
2) Build pipeline:
My "ADF PASS CICD - CI - ARM" build pipeline is automatically triggered

3) Release pipeline
When my Build pipeline is finished, then Release pipeline is automatically started and Data Factory code is deployed both to Testing and Production environments, PowerShell scripts are executed as well.

Summary:
1) Both Build and Release Azure DevOps pipelines can be successfully used for Data Factory code deployment.
2) ADF triggers' code deployment is properly managed with the help of the PowerShell script.
Link to my GitHub repository with the ADF solution from this blog post can be found here: https://github.com/NrgFly/ADF-CICD
Happy data adventure!
Thank you Rayis. This is a good read and a crucial concept you explained. It will be highly useful if you could do a demo video and upload it on Youtube.
ReplyDeleteVisualizing some steps is hard as some people might be just exploring and comparing Azure Toolset with On Prem and other Cloud Tools.
Thanks for your comment, the Part 1 has my YouTube video version session: http://datanrg.blogspot.com/2019/02/continuous-integration-and-delivery.html
DeleteCan you create a demo of part 2?
ReplyDeleteI could do this as well, it's only a matter of finding enough time for this.
DeleteHello - Can anyone help with the Python or Powershell code where I have a list of Pipeline triggers I need to enable with after My release ,although the trigger can be in my lower environments but I need to a script where I can activate them in my Prod environment everytime after my deployment process .
ReplyDeletehttps://github.com/SQLPlayer/azure.datafactory.tools
Delete